
support@pattrac.info
This lesson describes how to create an claim batch for electronic claim processing. This is also referred to as creating an EDI batch, or EDI Claim files.
Create a new Claim Batch
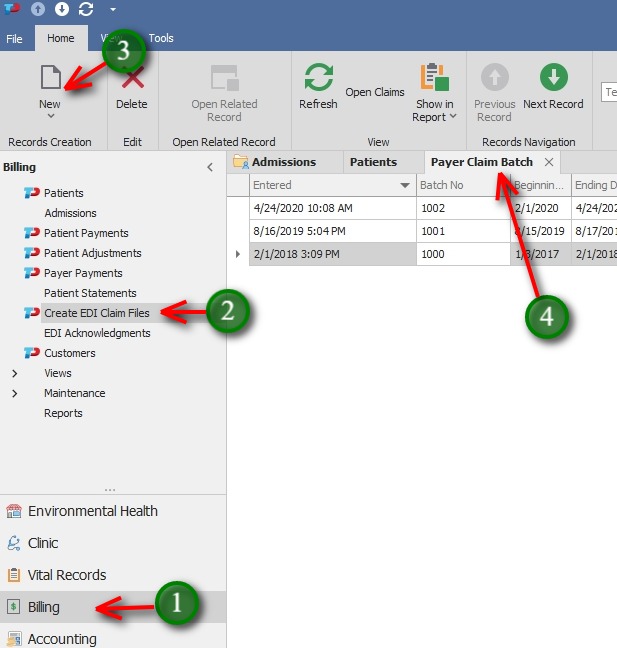
1. Navigate to the Billing Module
2. Select Create EDI Claim Files from the navigation panel.
3. Click the New icon in the top ribbon to create a new batch
4. Previously created batches will display in the Payer Claim Batch screen
Enter the Batch Details
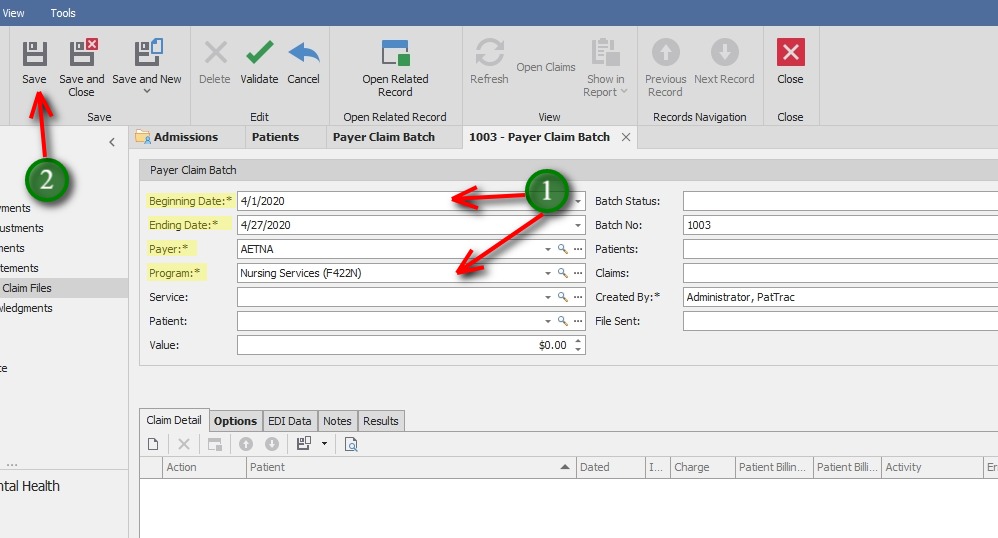
1. Beginning and Ending Date – select the claim date range
Payer – Select the Payer/Insurance Company
Program – Select the Program to create claims for
2. Click the Save button to save the batch details
ADDITIONAL FIELDS
Service – This field is optional to select
Patient – This field is optional to select, (used primarily when creating claims for a single patient)
Value – The total amount of the claims will populate after creating the claim batch
Batch Status – This field is optional to select. Some agencies use to track payment status, i.e. Open, Partially Paid, Complete
Batch No – This ID will populate when the batch is created
Patients – This field will populate automatically with the total number of patients in the claim file
Claims – This field will populated automatically with the total number of claims in the batch
Created By – This will populate with the logged in user’s name
File Sent – This date field can be updated once the file has been submitted
Find Claims
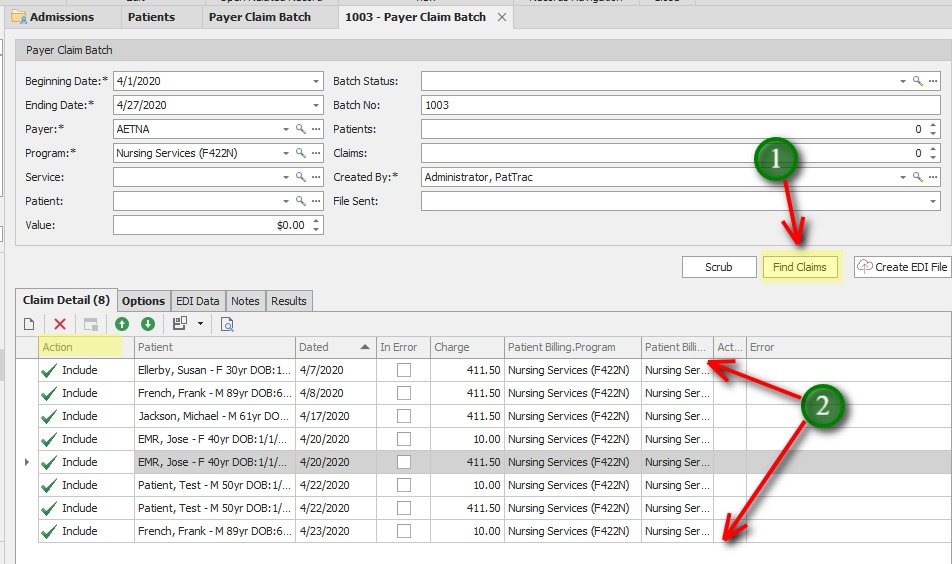
1. Click The Find Claims button
2. Claims that match the batch criteria will be displayed below in the Claim Detail tab.
By default, all claims will be set to “Included” in the Action column.
Scrub Claims
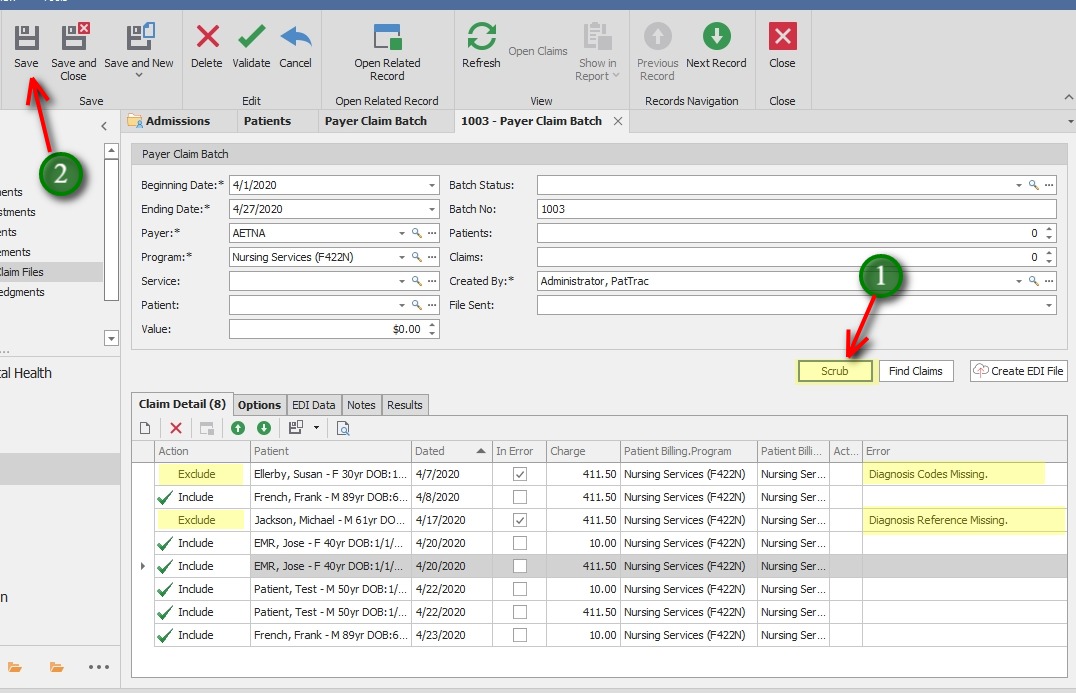
1. Click the Scrub button.
The Scrub feature will look for common mistakes in claim transactions that lead to common Insurance denials. In this screen shot, two claim transactions are missing information as noted by the Error column.
Claim transactions that produce an error are automatically set to “Exclude” so they are not sent with the batch.
2. Save the Batch
At this stage, the claim file can still be created and sent to the payer, leaving the excluded claims to be corrected and sent later.
This lesson will continue with the process to correct the claims at the present time, during the claim creation process.
Correct the Claim
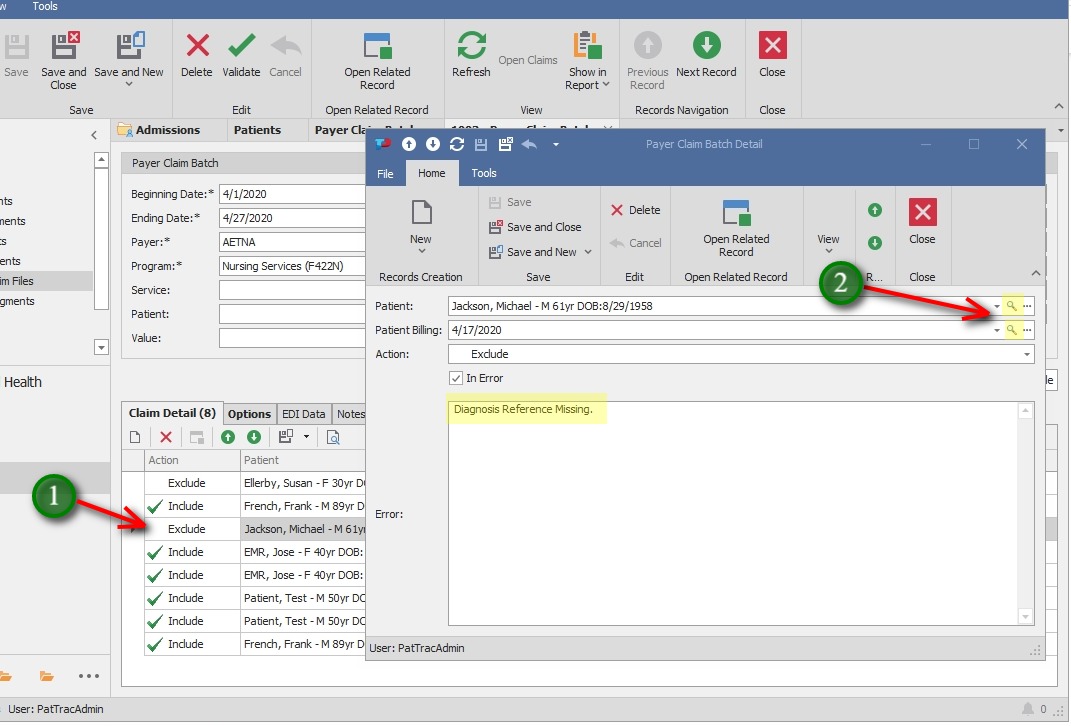
1. Locate the claim to correct and double-click the record to see the claim detail window.
2. Use the magnifying glass at the end of the Patient field to access the patient’s demographic screen, admissions, etc.
OR
Use the magnifying glass at the end of the Patient Billing field to access the specific activity rendered record to correct an error related to CPT, POS, etc.
** In this example, click the magnifying glass next to the Patient field and navigate to Admissions > Diagnosis tab.
Correct the Claim (continued)

Navigate to Admissions > Diagnosis tab to add a “1” in the Reference field in the diagnosis record.
Save and Close the Diagnosis window
Save and Close the Admission screen
Save and Close the Patient screen
Correct the Claim (continued)
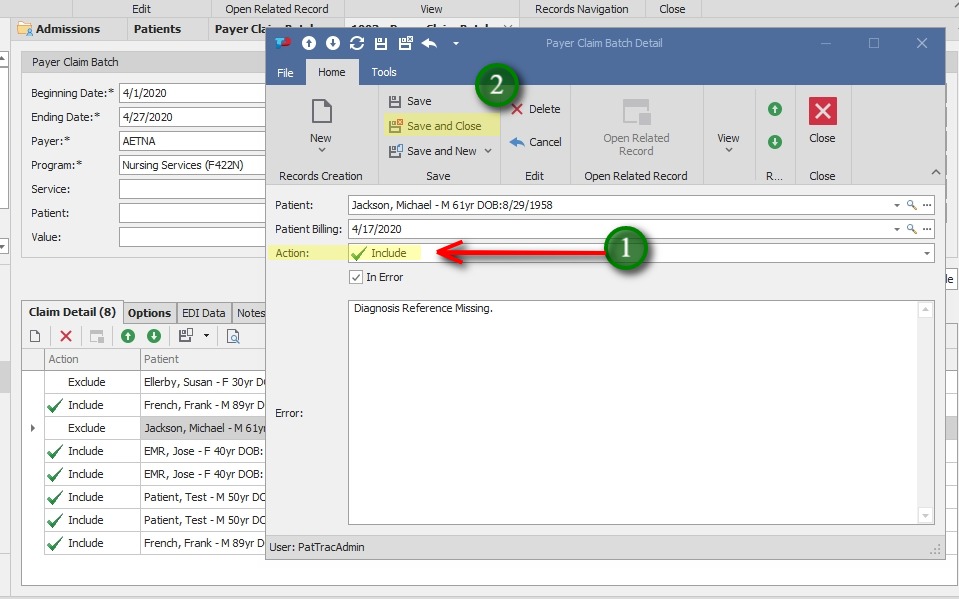
1. Once corrected, set the Action field to Included
2. Save and Close the Claim Detail window
Correct the Claim (continued)
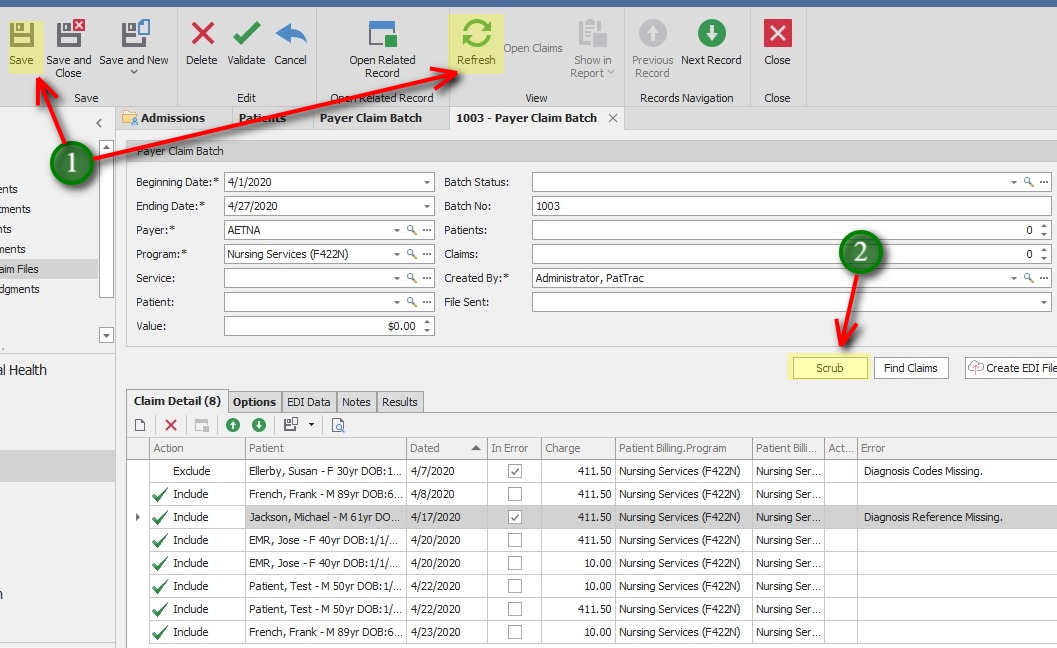
1. Save and Refresh the Batch screen to ensure corrected claims are captured in the Claim Batch.
2. If desired, Click the Scrub button again to ensure all errors are corrected. Save the Batch again. (This will also clear any exisiting error codes from corrected claims.)
Create the Claim File
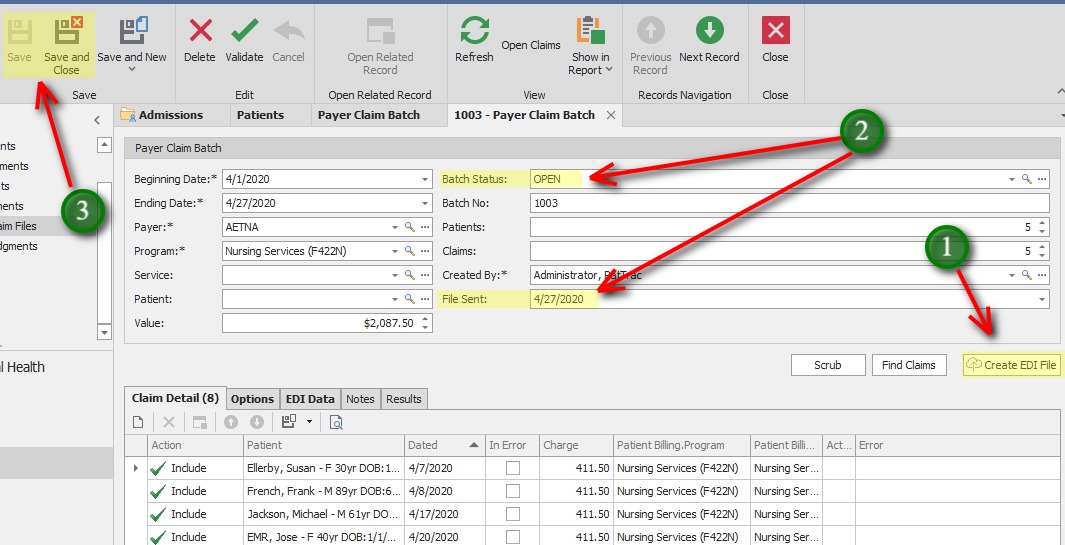
1. Click the Create EDI File button to create the claim file.
** If submitting to Change Healthcare clearinghouse, the file will be transmitted automatically.
*** If uploading to Medicare Novitasphere Portal or Medicaid directly, the file will be saved in the local Documents directory on the PC creating the file.
2. Update the Batch Status filed if desired, and the File Sent field.
3. Save or Save and Close to exit the screen.
Options Tab
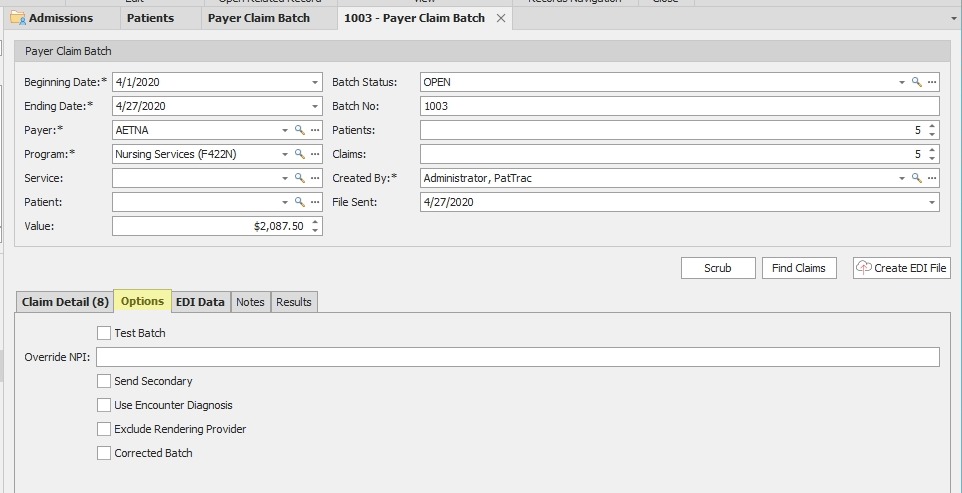
The Options tab contains several checkboxes that may be used as needed for the claim batch.
Test Batch – The flags the file as a test file and it does not get transmitted.
Override NPI – This is used to override the current NPI attached to the Program. May be required by some payers.
Send Secondary – This is used to flag the claim batch as Secondary.
Use Encounter Diagnosis – By default PatTrac 2.0 sends the Diagnosis code attached to the Admission record in the claim file. This allows for sending the diagnosis code attached to the claim’s Encounter record.
Exclude Rendering Provider – By default, rendering provider information is included in claim files. This will exclude any rendering provider information from the file.
Corrected Batch – This flags the file as a corrected batch.
Additional Tabs and Info

EDI Data – This tab displays the EDI Information being transmitted in the claim file.
Notes – This is a text area to add Notes specific to the claim batch.
Results – Claim files going directly to Change Healthcare will display transmission results here.
Keys for successful claim creation:
Current Location – claim files include information about the facility name, address, etc. based on the user logged in. Set the location by going to the Tools menu in the top ribbon, then double-click My Info. Select the location you want to bill for, Click OK.
Each employee should have their Current Location set in their employee record.
NPI – The NPI that is included in the claim file comes from the Program Maintenance screen. Enter the NPI by going to Administration > Programs. Double-click the Program Name to edit, and enter the NPI in the NPI field. Click Save and Close to save the record and close the screen.
Rendering Providers should have an NPI in their employee record under Personnel > Employee Maintenance
Payer EDI Address – Be sure the insurance companies to bill for have the correct EDI Format selected. This is under Billing > Maintenance > Payers. Find the Payer in the list and edit the EDI Format field.
EDI FORMAT TYPES:
“Change Healthcare Professional” – electronic claims going to Change Healthcare clearinghouse (formally Emdeon), typically MCOs, BC/BS, other private ins.
“Medicaid – #####*” – Electronic claims going to straight Medicaid. File is uploaded directly via Medicaid Website. *There should be a Medicaid entry for each Provider # within the agency.
“Medicare”– electronic claims submitted via Novitasphere Portal to Medicare